Teams
Accounts
Everyone who uses Airbrake is associated with an account. An Airbrake account contains all the users and teams and their respective roles related to that particular account. Accounts also include profile settings, plan options, and billing preferences that can be managed by users assigned to the Account Admin role – more on roles and their relationship to users, teams, and projects below.
Users and Teams
Accessing and Editing Users
- Users can be accessed on the right navigation bar by clicking
Users. - On the user page, users are listed, with two-factor auth status as well as the teams and projects they’re associated with.

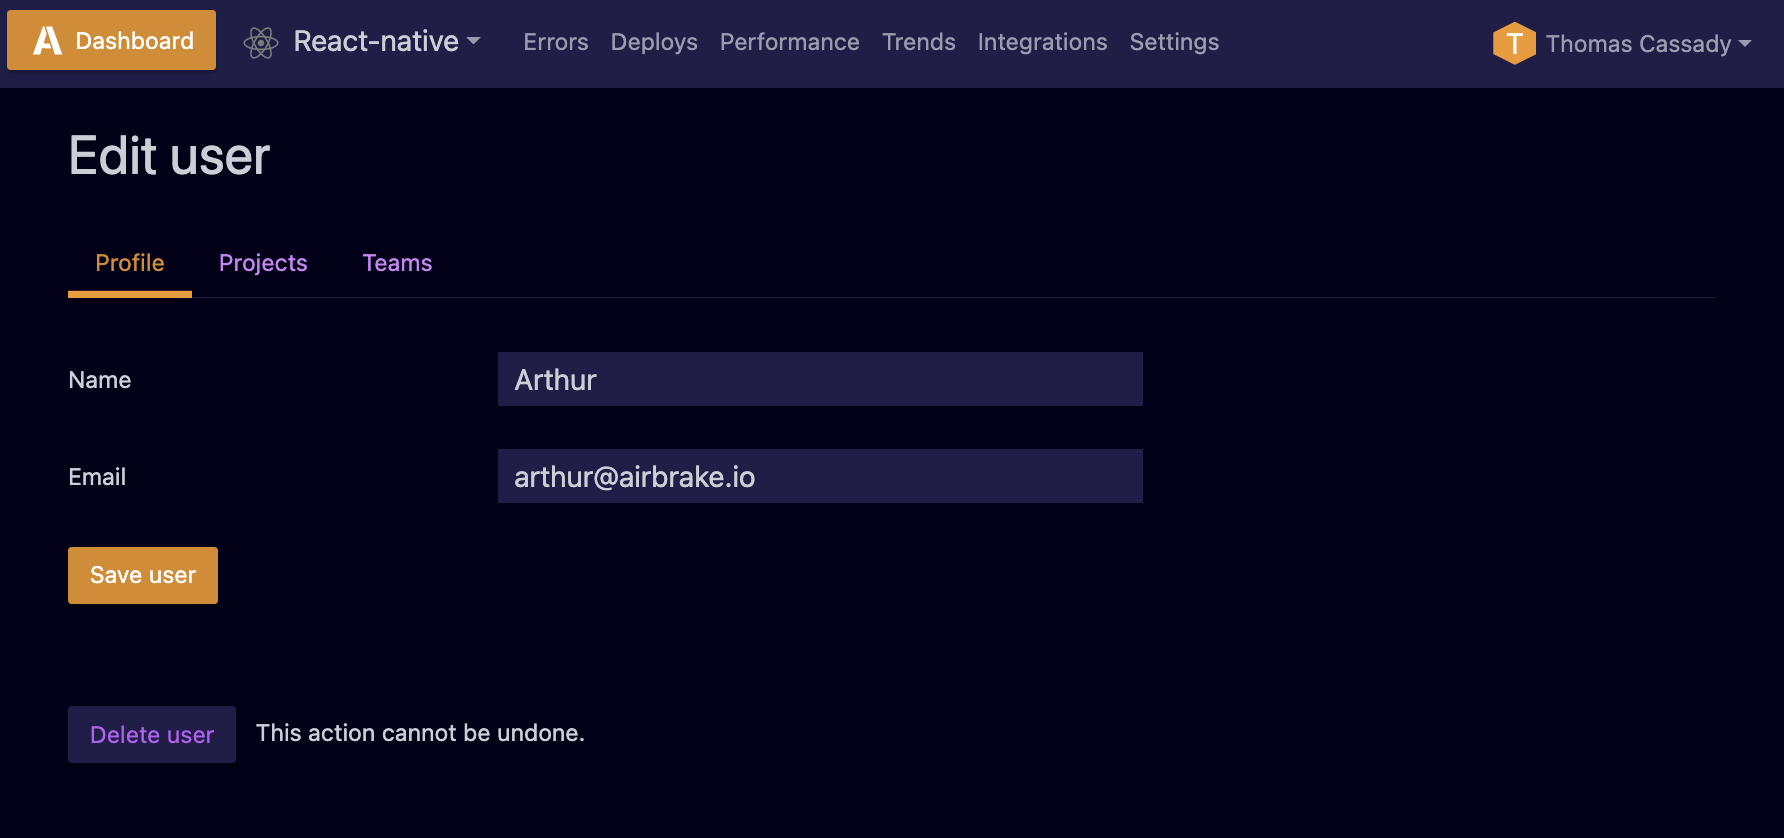
- Clicking on the user’s name brings up the edit user page. Here, you can edit user details and remove the user.
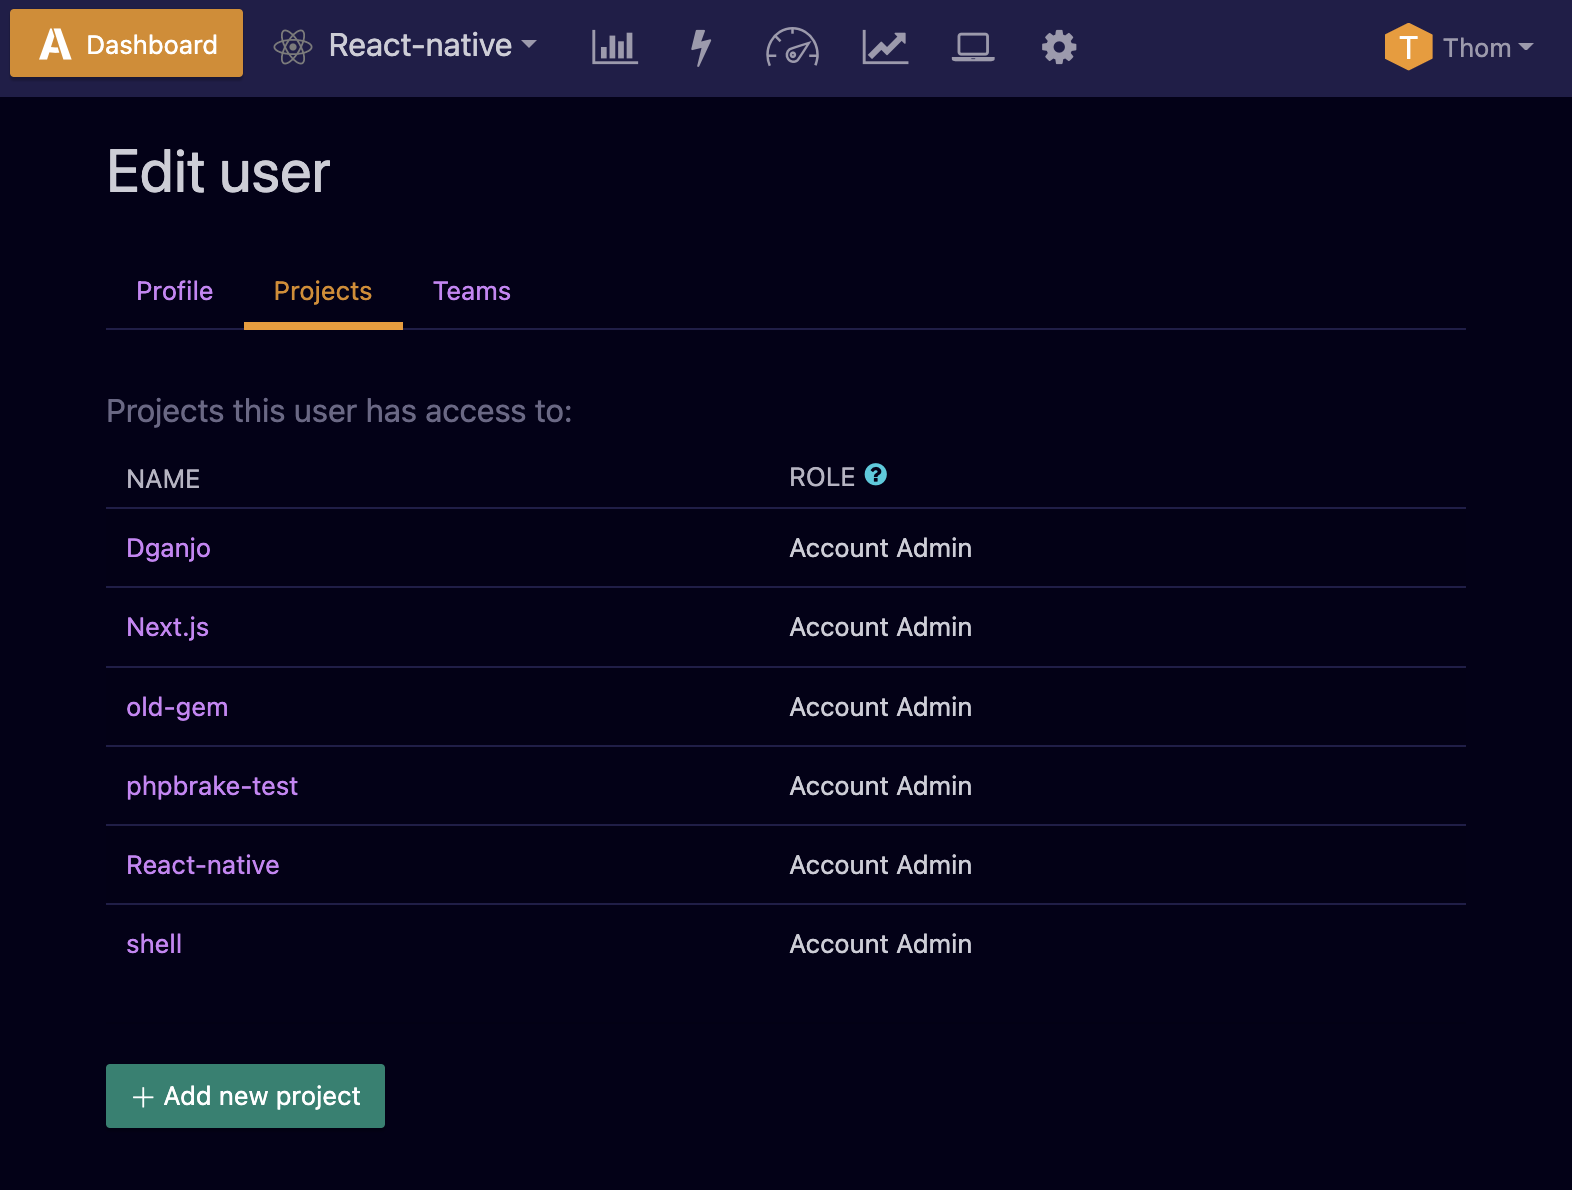
- Clicking on the
projectslists the projects the user has access to. Account admins have access to all projects and the ability to edit users, teams, and other account settings. Other users have access to projects with the Project Admin or Member role. Users can have direct access or access through the team(s) where they are members.
Adding New Users
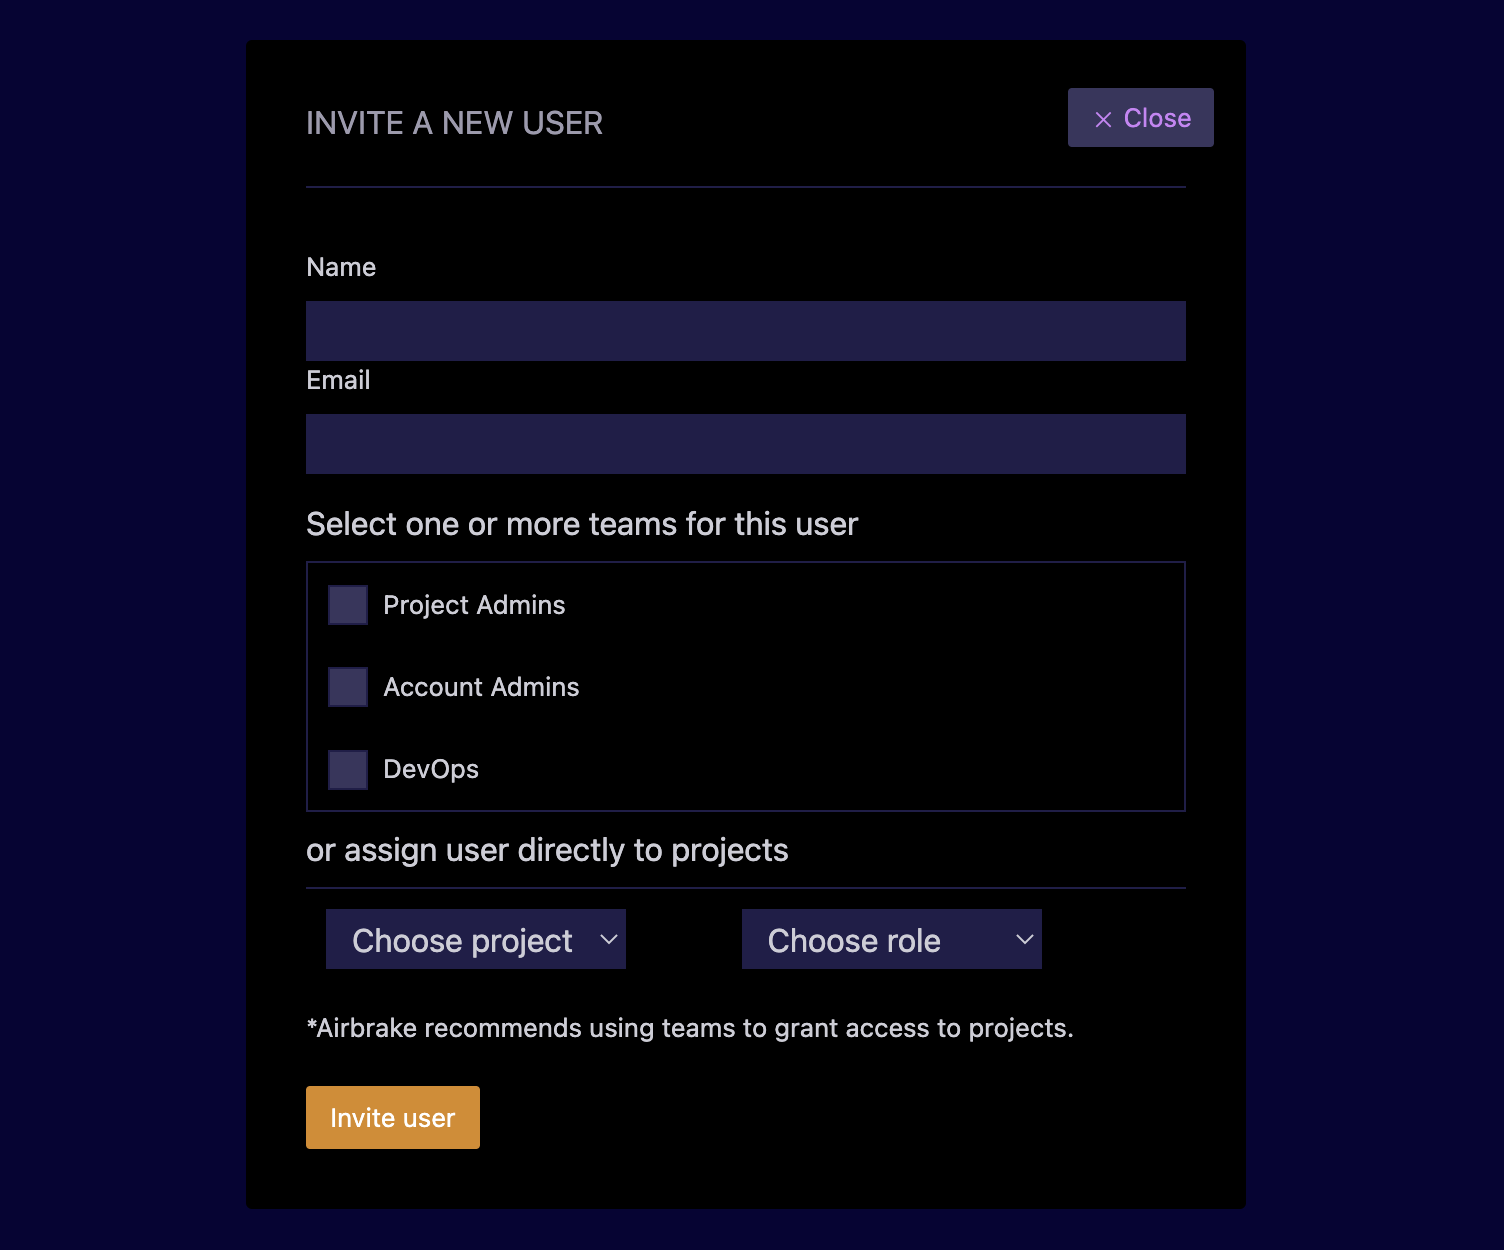
- From the user page, you can also add a user using the
invite a userbutton at the top right of the page. Once clicked, a new pop-up will be displayed, where you can add the user’s name, email (email must be unique across the account) and invite them as a member of a team or add them to specific projects.
Teams are containers that group users together to perform specific roles. The roles are assigned on a per-project basis under the project’s settings shown in the Project section. By default, teams do not have any access to projects.
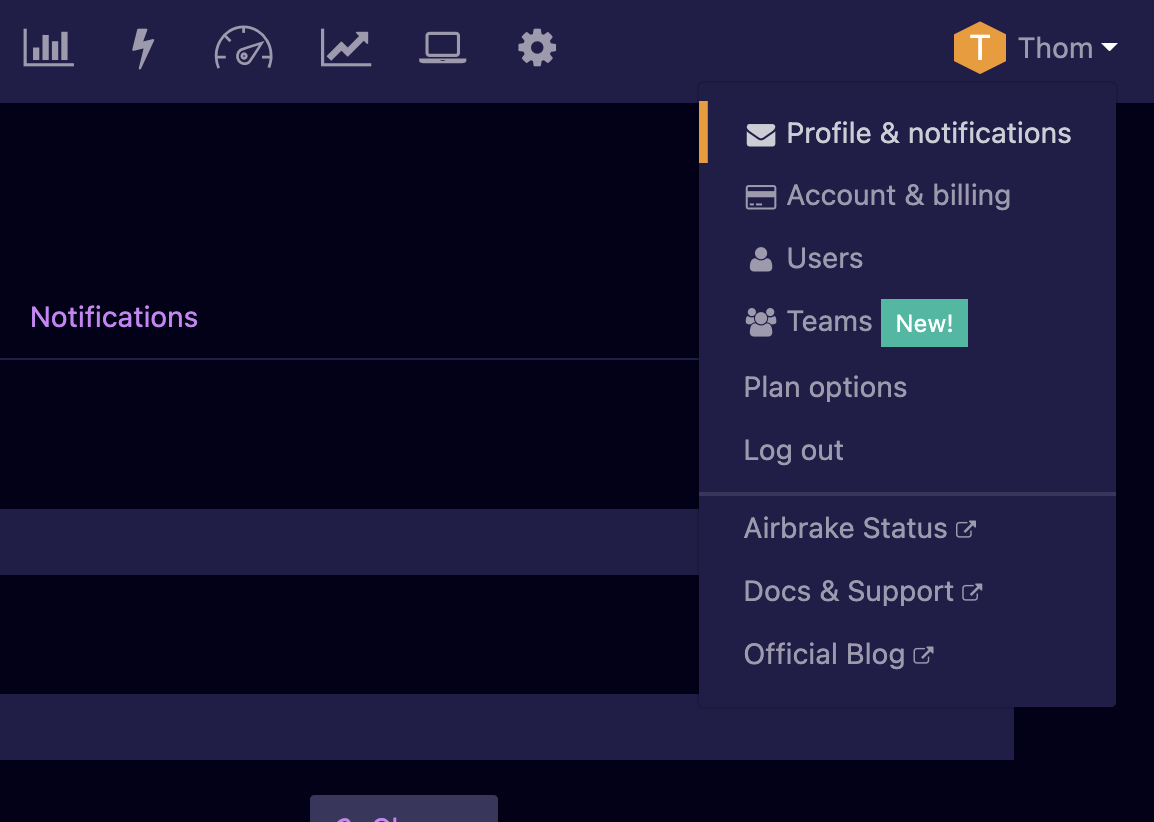
Teams can be accessed in the user settings panel.
- The Teams page displays existing Teams in your account. The team “Name” can be any name (duplicate team names are not allowed), users show the number of users in a team and the number of projects where this team has a particular role.

Creating a team
- Click the
Create a teambutton to create a new team. In the pop-up window provide Team’s name, again this can be any unique team name, select users in your Account to add to this team, and click theCreate teambutton.
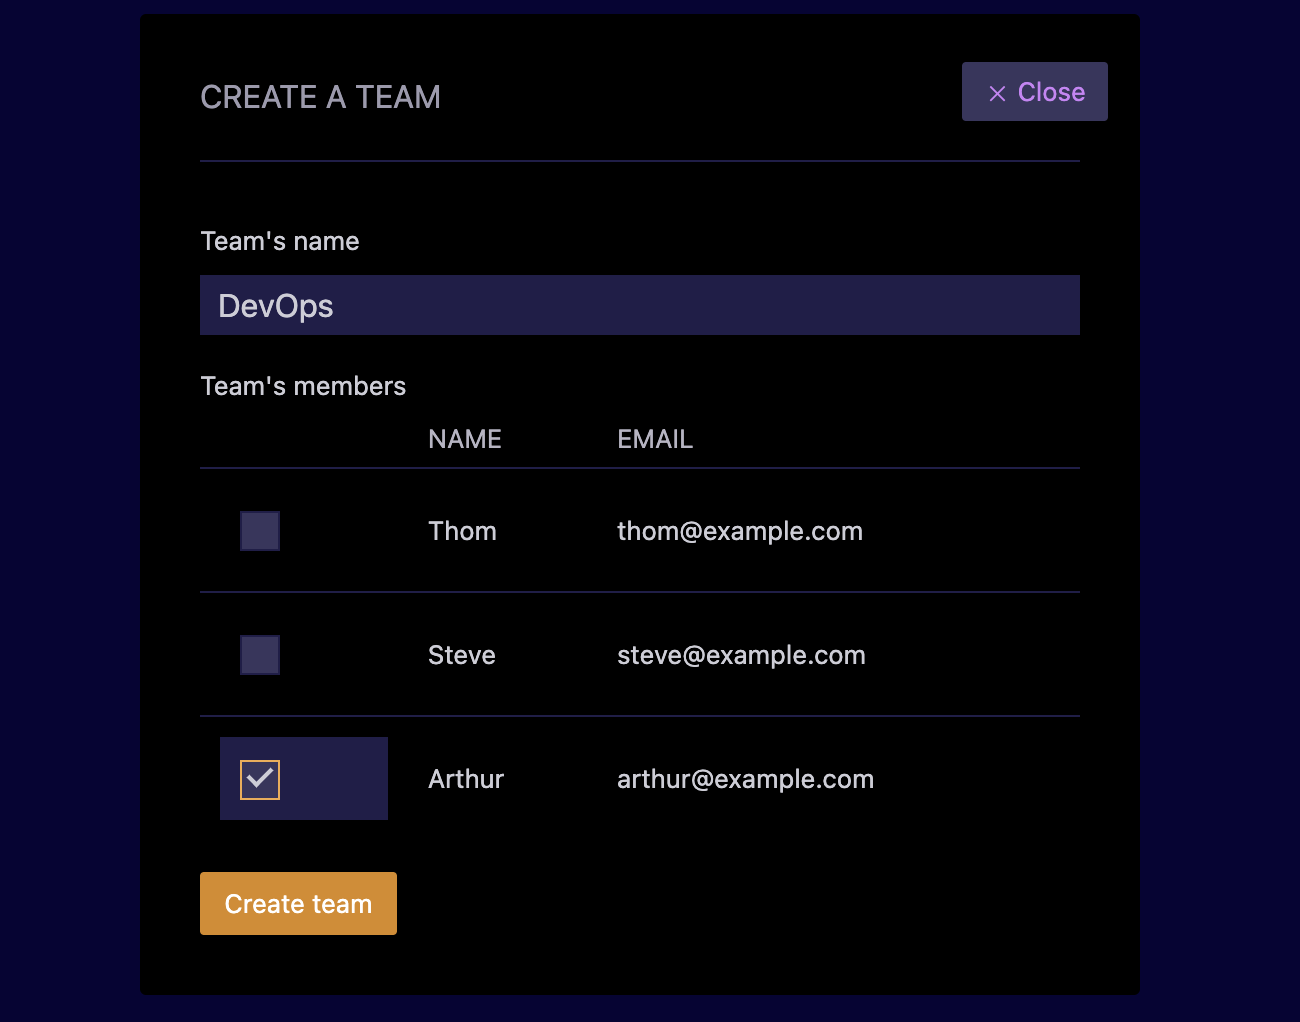
- A success message confirms the team creation and the table will show the newly created team.
Editing a team
- Clicking on the name of the Team will show the Edit screen where you can add/remove users, change the name of that Team and also delete a team.
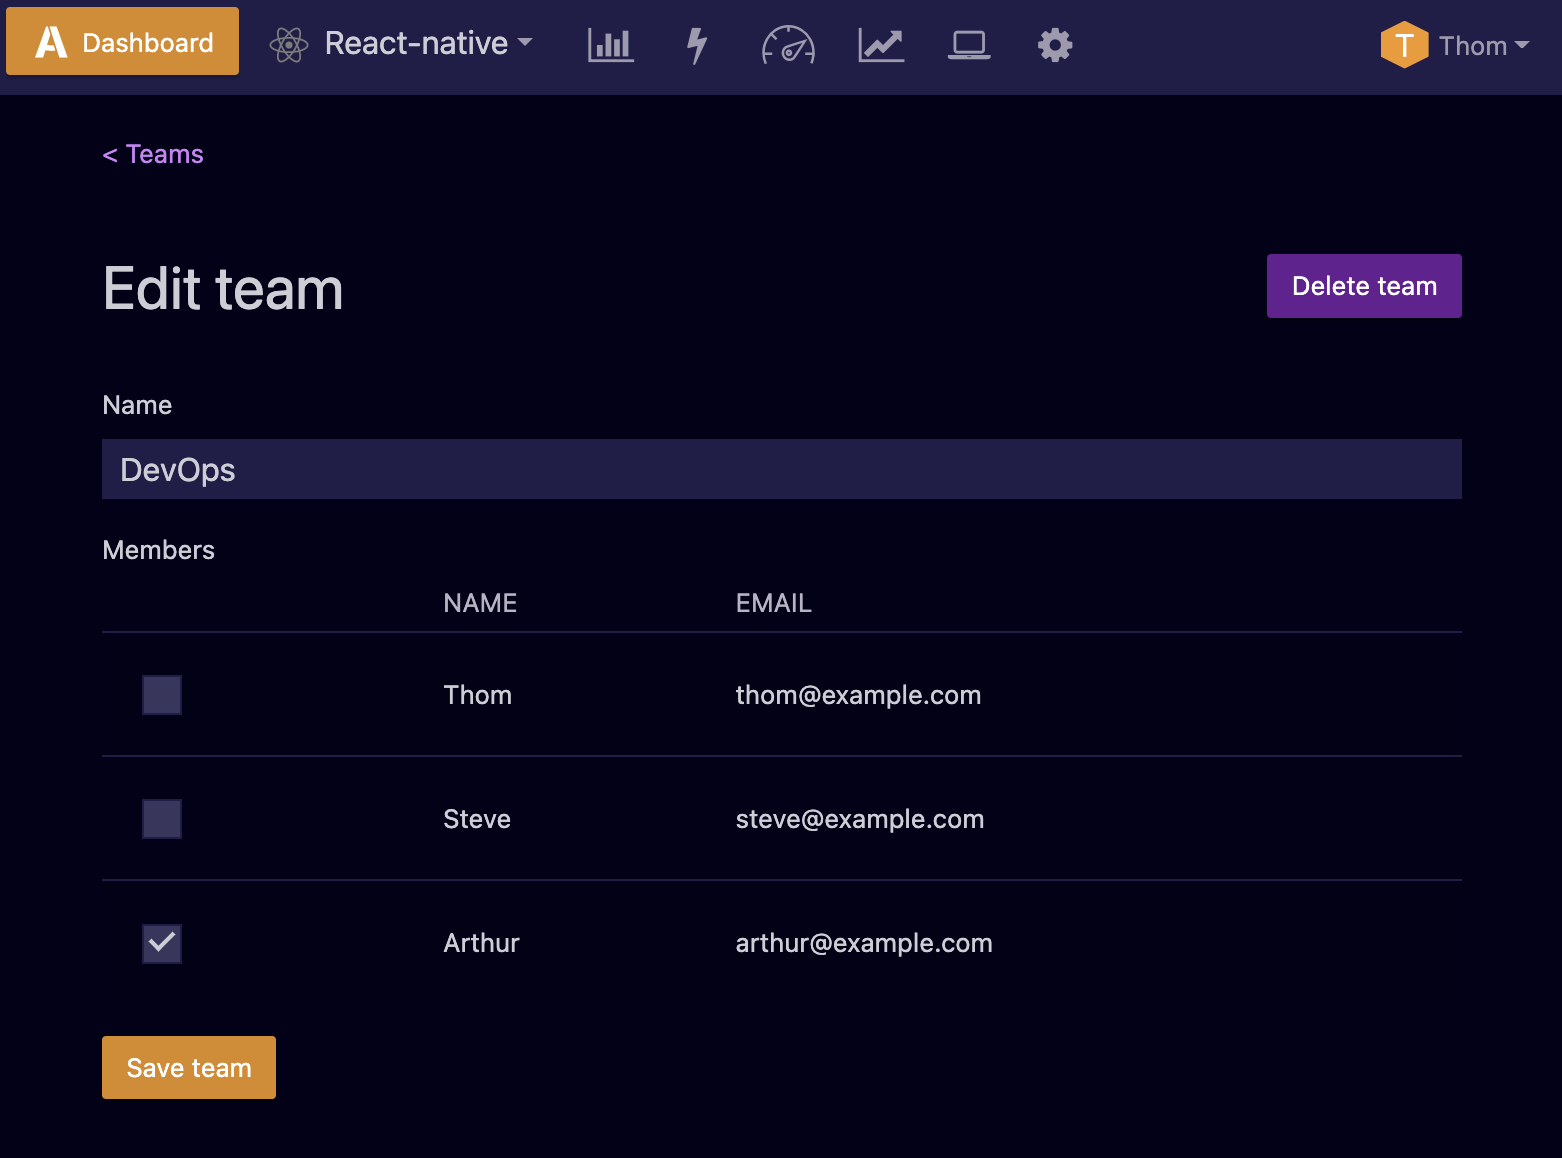
- Click the
Save teambutton to save any new changes/updates. A success confirmation will be displayed on the screen. After saving the changes, you can click the Teams link on the top left to go back to the Teams screen.

Deleting a team
- A team can be deleted by clicking the
Delete teambutton on the Edit Team screen. A prompt will pop up asking to confirm the deletion. A deleted team cannot be recovered.
⚡ The account admin team cannot be deleted.
🔴 Deleting a team is an irreversible process.
Roles
- With the introduction of Teams, Airbrake created three default roles for every account. Roles are no longer configured per user.
- These three roles can only be assigned to teams and are defined as follows:
- The “Member” role can view projects, resolve errors, and comment on error groups. The Member role can also create deploys, save customer aggregations, and use enabled 3rd party integrations.
- The “Project Admin” role can add or remove users and teams to projects, but cannot add/remove users to/from teams. The Project Admin role can also rename projects, change a project’s API key, and adjust project-level usage caps. It can also do everything the “Member” role can.
- The “Account Admin” role has complete control over an account’s settings, including profile settings, plan options, and billing preferences. Users in the Account Admin team can also invite users, create teams, and manage roles. There must be exactly one team per account with the “Account Admin” role. The name of the team may be changed, or a different team may be selected in its place, but the team with the Account Admin role may not be deleted. It can also do everything the “Project Admin” role can, for all projects.
A more granular list of each roles’ capabilities is also listed below as an additional reference.
Member
- View projects the team is attached to
- Resolve, mute, and delete errors
- Create deploys
- Comment on an error group
- Create aggregations
- Use enabled integrations, e.g., create GitHub issue on an error group
- View project trends
- Manage user profile
- View dashboard
- See what teams you belong to
- Leave a team
- See projects you have access to
- Mark projects as “visible” for notifications and dashboard
- Configure notifications for themselves for a project they have access to
- Reset user API key
- Cannot
- Alter project settings
Project Admin
- Everything the Member Role can do, for all projects the team is attached to
- Associate teams/users to project with a role
- Remove teams/user from projects
- Rename the project
- Change the API key
- Change project-level usage caps
- Change project settings
- Setup integrations
- Cannot
- Create projects
- Delete projects
- Alter Account details.
Account Admin
- Everything the Project Admin Role can do, for all projects
- See a list of teams
- Create teams
- Add user to a team
- Remove user to a team
- Delete teams
- See a list of projects
- Create projects
- Delete projects
- Change account name and subdomain
- Change/view billing information
- Change plan selection
- Change account usage caps
- Update account security settings, e.g., 2FA/SAML
- Act as a Project Admin on any project
Project
- Roles are assigned to individual users or Teams on a per-project basis. Roles can be accessed on the Project Settings page under the Access tab.
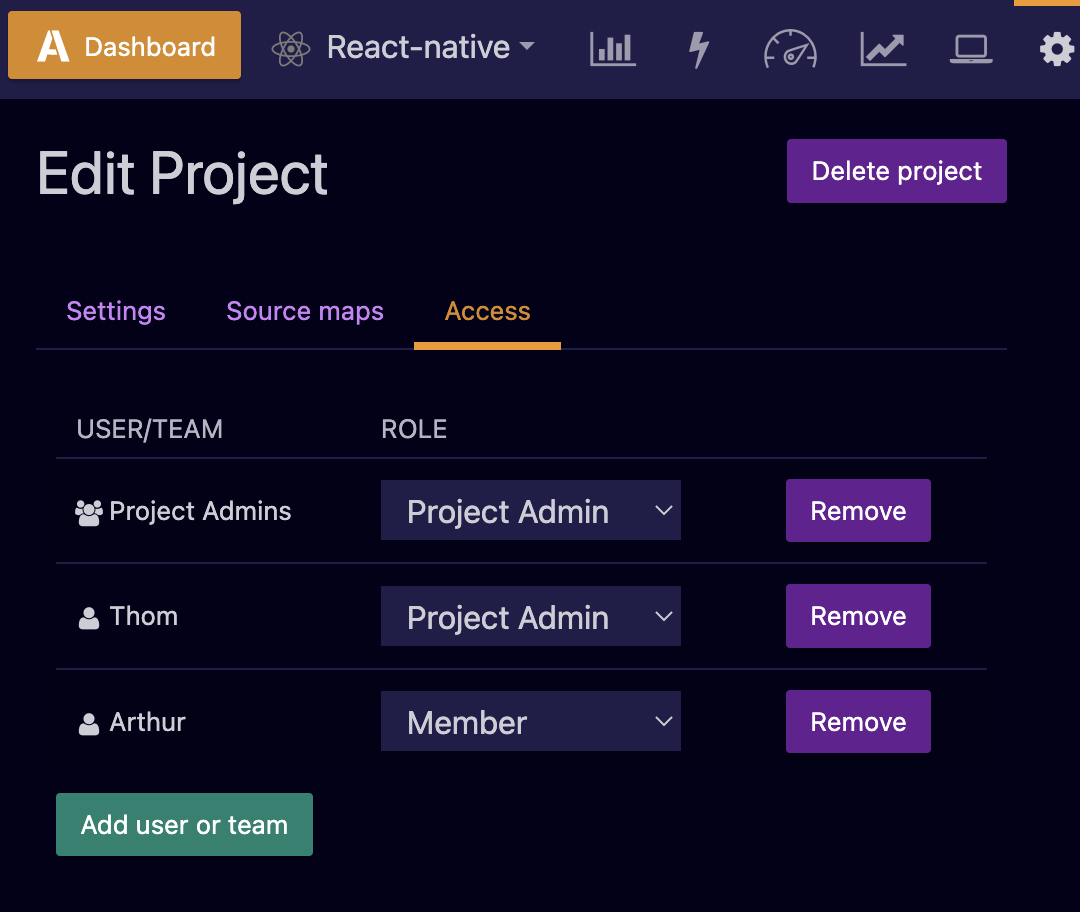
Adding users or teams to a project
- Individual users or teams can both have roles on a project. This addition can
be done by clicking the
Add user or teambutton on the access tab of your project’s settings page. - After clicking the
Add user or teambutton, a pop-up window will appear, showing a list of current users and teams in the organization. - You can select a user or team by using the Search field or clicking the list’s name. For example, we choose the “DevOps” team from the list.
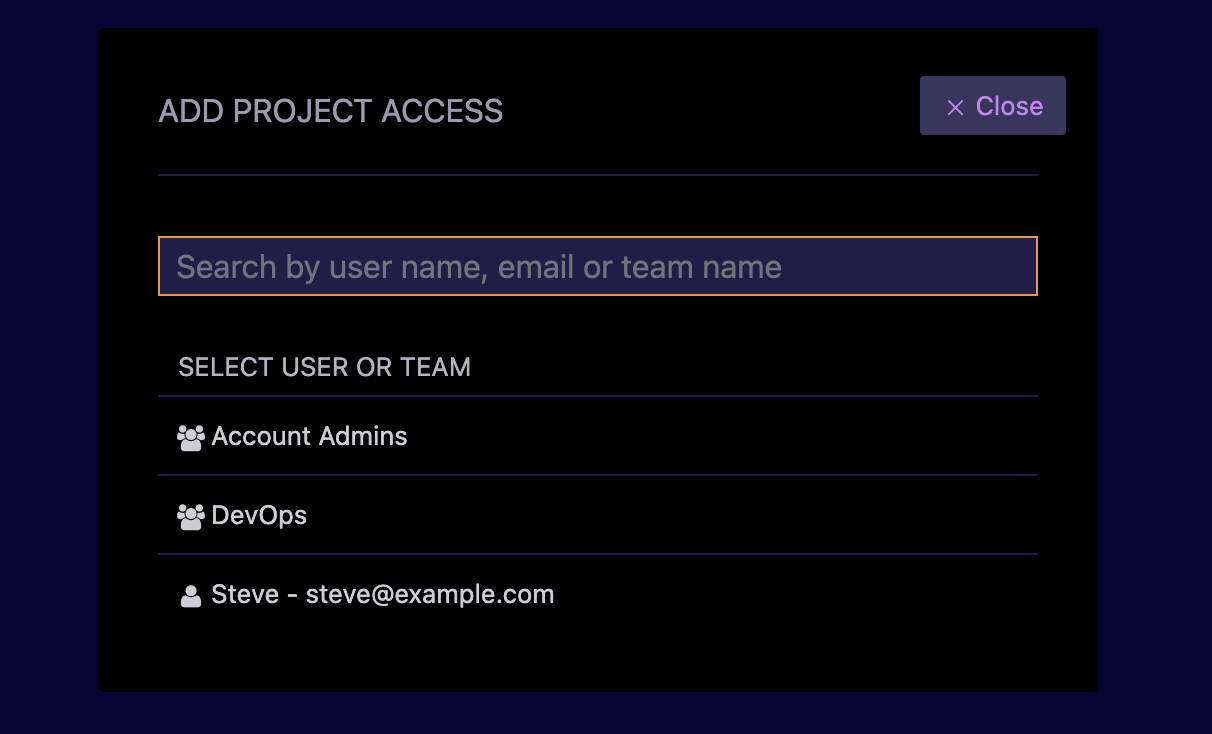
- Next, let’s add the required role for the selected user or team and click “Add project access.” For this example, let’s pick the “Member” role.
- A confirmation message will be displayed on success.

- The Team (DevOps) with the new role (Member) will now be displayed in the Access tab table.
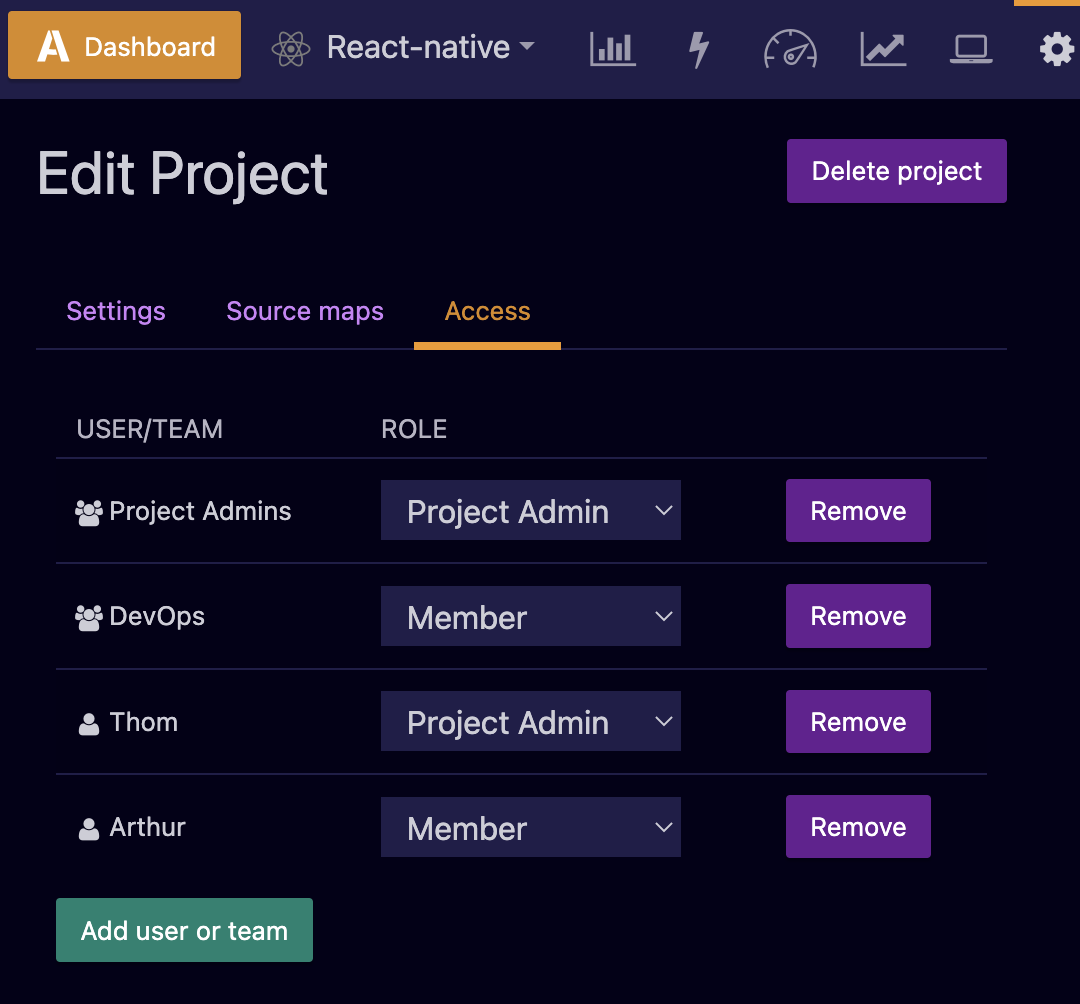
Removing user or team role
- The role for a particular team or user can be removed by clicking the
Removebutton. A message will pop up confirming the user role has been removed from the project.
Expanded Access
- Teams is currently in beta. If you want to create additional teams beyond your account’s quota, please reach out to us at support@airbrake.io.